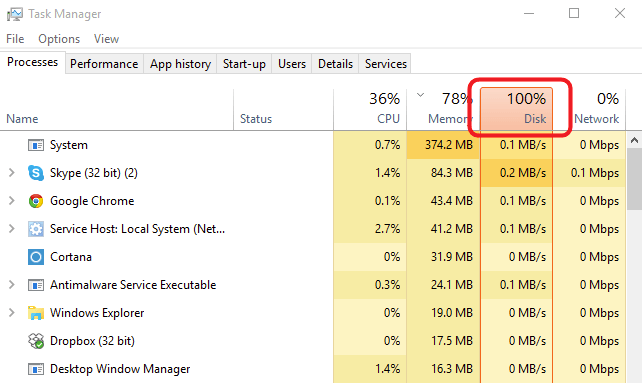
You may sometimes have this problem occurring on your Windows 10 PC, where the processor tab in the task manager shows 100% Disk Usage. This could slow down the processor to an extent where the PC is hardly able to respond to your commands.
Users must know that this issue may occur by itself independent of user-driven command inputs. Follow the article to get hold of the issue and resolve it.
Contents
How to Fix a 100% Disk Usage on Windows 10
Here is the list of seven ways this issue could be resolved. Start fixing right with the help of the first method, only move to the next if the previous’ did not work for you. Swipe down, and you find a detailed description of how this issue can be fixed.
Read Also:
Method 1: Disable SuperFetch Service
SuperFetch is an inbuilt facility in PCs running on various versions of Windows OS. The aim of the feature is to decrease boot time, i.e., time taken to launch any application of most used apps on your PC.
It may sound a quality feature, but it is also a significant cause of disk performance issues in later versions of Windows OS. Below we see how to disable this feature and get our PC back on track.
Step 1. Press buttons WindowsKey + X together, next choose Command Prompt (Admin) from the pop-up.
Step 2. Next, you have the User Account Control prompt where you are recommended to hit the Yes option.
Step 3. Once the command prompt appears in front of you, you are required to type the following code.
net.exe stop superfetch
Step 4. Press the Enter key on your keyboard.
Step 5. If the Command above doesn’t work, you have it another shot. This time type in the Command Prompts the following Command.
net.exe stop sysmain
Step 6. It would take minutes to process and reconfigure the disk usage.
Step 7. Search for Task Manager in your Windows Search panel. Right under the processes tab, check for the % usage of the disk. If it is still 100%, proceed with the next option.
Method 2 – Perform a Disk Check
This process is pretty much a simple one but can’t deny that it’s the most time consuming one. Follow the lines below:
Step 1. Press Windows key + X together to choose Command Prompt (Admin) from the pop-up to open the command prompt. You must now click YES at the bottom of the appeared User Account Control prompt.
Step 2. Now type in the following code in the Command Prompt. chkdsk.exe<space>/f<space>/r
Step 3. Click ENTER on your keyboard, after which you type in Y as a mark of confirmation that you want to perform a disk check. Disk Check is performed only when the computer is re-booted the next time. Please note that you must close all applications before you shut down the PC the next time.
Step 4. Disk check is initiated when the computer is restarted, and it is essential to note that it may take a long time for the process to terminate, sometimes even a whole day. You also have the option of rescheduling the DISK CHECK process when the system is first rebooted.
Step 5. After the above procedure is accomplished, search Task Manager in the Windows Search Bar than in the Processes tab check the column titled disk. If it is still 100%, you might want to try the remaining methods that follow.
Method 3 – Reset Virtual Memory
Virtual memory takes its place when the Random-Access Memory(RAM) is no longer available to store data. With insufficient RAM, virtual memory addresses are created on your hard drive that is used to store data for temporary use, which are transferred back to the RAM whenever required.
This could also be a potential cause for the disk usage problem which you might currently be encountering. The following part deals with the how-about of resetting the virtual memory. Check it out.
Step 1. Firstly, press Windows key + Pause/Break together. Then on the newly opened window, in the panel of the left side, go on to click Advanced system settings.
Step 2. Secondly, select the Advanced tab from the next screen. Then, click on the settings button.
Step 3. Next, go on to the Advanced tab again, select Choose in the virtual memory section.
Step 4. Make sure that in the newly opened window, AUTOMATICALLY MANAGE PAGING FILE SIZE FOR ALL DRIVES checkbox is NOT ticked.
Step 5. Following, select the Windows Drive that has Windows OS installed in it, which is most of the time C: after which you assign values to each of Initial Size & Maximum Size.
- INITIAL SIZE: If you are with no idea as to what value to enter, you may just make sure to enter the numeric that is available at the Recommended category.
- MAXIMUM SIZE: This cannot take any bigger value than 1.5 times the size of the system’s physical RAM. For example, a PC with 4 GB RAM can’t have a Maximum Size or virtual memory value greater than 6144 MB or 6 GB.
Step 6. Select Set after assigning the values. Then click on, OK.
Step 7. Press Windows key + R together, as a result of which a tab titled RUN would appear, then in the space to type, type temp and continue by clicking ENTER. It identifies any folder on your computer with just the same name you just entered. The next thing to do would be to select all the files and folders in the temp folder and to delete them.
Step 8. Now you must check your disk usage as you always did at the end of any previous process by typing Task Manager in the Windows Search Bar; next in the Processes tab, check the percentage value in the column titled Disk. If it is still 100%, go with the other methods which could solve it.
Method 5 – Disable Antivirus Software Temporarily
Antivirus or Anti-malware programs might also be the reason for 100% disk usage. Norton, Kaspersky, AVG are to name a few of them. To check if they are the reason behind the issue temporarily disable them for a moment.
If you ever feel your computer is exposed to external malware kind of risks by turning these applications down, there’s always WINDOWS DEFENDER working behind the screen to give your PC enough protection for that particular time period.
Once after you disable the Antivirus application, check for the disk usage by searching Task Manager then in the processing tab in the column titled Disk check if the percentage is still 100. If yes, you just go on to try the next method to fix it.
Method 6 – Fix your StorAHCI.sys Driver
Another possibility of the reason behind the 100% disk usage problem might be due to an Advanced Host Controller Interface PCI-Express(AHCI PCIe) model running with the inbox StorAHCI.sys driver due to a potential firmware bug.
The following steps aim to guide you towards solving the issue.
Step 1. First of all, press Windows Key + X together and then choose Device Manager from the screen that pops up.
Step 2. Secondly, click on the IDE ATA/ATAPI Controllers section to expand it and thereafter open AHCI Controller.
Step 3. Next, Driver -> Driver details. If you could see in the details that say storahci.sys is stored in the path of the system32 folder, then you must be running the inbox AHCI driver.
Step 4. Following, switch on the Details tab, then from the drop-down menu, choose Device Instance Path. Note down the path starting from VEN_.
Step 5. Search for regedit in the Windows search panel of your PC. Click on to open the Registry Editor, which will be a result of your search.
Step 6. After that, go to the following address.
HKEY_LOCAL_MACHINE\System\CurrentControlSet\Enum\PCI\<AHCI Controller>\<Random Number>\Device Parameters\Interrupt Mnagement\MessageSignaledInterruptProperties
<AHCI Controller> stands for the name you see in the 2nd step i.e., just before AHCI Controller you’d see some other text.
<Random Number> is specific to PCs.
Step 7. Then, double click on the MSISupported key and reconfigure the value to 0.
Step 8. Lastly, restart the computer and check if the problem still persists. Search for Task Manager in the windows search bar and look into the Processes tab. If you still see 100% in the column titled DISK, then scroll down to solve the issue with other methods of fixing.
Method 7 – Switch to ChromeOS
Before recommending you switch over to Chrome OS, let’s analyze the relative disadvantages of Windows OS when compared with Chrome OS. Windows’ way of operation has always been questioning the user’s security with a lot of third-party programs installed in the storage paving path to various malware and viruses.
Emphasis is on using web-based applications with nothing being stored locally, and thus the operation style of Windows is considered bygone.
Another reason why Windows OS doesn’t stand up to a good period of life is that the registry corruptions might often occur when the computer shuts down unexpectedly or when a program installs, uninstalls, or updates incorrectly.
Furthermore, it is needless to say when everything is saved and accessed locally, and you run out of space much sooner. Chrome OS does not install any applications locally and that everything is accessed through the internet reduces the chance of entry of viruses and malware.
Read Also:
- Critical Process Died
- The Default Gateway is Not Available
- Potential Windows Update Database Error Detected
Conclusion
The article has dealt with the issue of 100% disk usage with utmost simplicity, and in a way that depicts that it isn’t much of a deal to resolve it. If one method doesn’t give you a positive result, jump on to the next.
Don’t hang up. In the last part of the article, emphasis on the negative aspects of Windows OS and the need to switch to Chrome OS has been done, which makes sense because we find many people out there unaware.


