After upgrading to Windows 10, many users have reported about several issues being faced by them, and one of the most common among them is The Default Gateway is Not Available. Users who suffered from this issue either have no access to the web at all or internet connection, getting lost every time.
The default gateway is not the available issue that can be seen by a symbol of no connectivity or limited connectivity in the system tray of their screen. After installing Windows 10, the computer switches to wireless and reports “no internet”.
The system tray usually shows a “Red X” on the network icon on the screen, and the user will not be able to access the internet on his or her device. The Default Gateway is that part of the system which passes packets forwardly from your network to the other outside networks.
When this error of The Default Gateway is Not Available in Windows 10 occurs on your device, you will be unable to communicate with any system from outside.
Contents
How to Fix The Default Gateway is Not Available Issue
The main reason behind the occurrence of Default Gateway is Not Available error is incompatible or the corrupted network adapter drivers and malware or viruses. So, there is a need to troubleshoot this issue entirely!
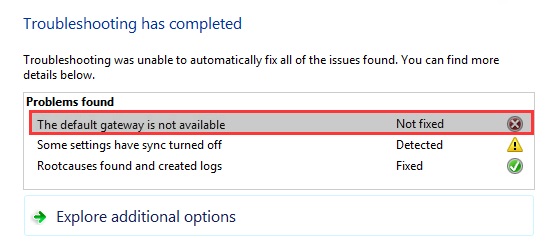
When influenced, the users would like to run Windows tools on their web connection; they would be quickly acquainted that the offender is their default gateway, which is not available.
Default Gateway is Not Available issue of The Default Gateway is Not Available can also be caused by any product of McAfee. And, one can now easily imagine how severe it will be without the web connection.
There are several methods listed below to solve Default Gateway is Not Available error:
Method 1 – Update Windows 10 and Drivers
This error has a direct relation with the hardware not being able to collaborate with Windows 10, and this problem arises due to the old drivers that are antipathetic.
Therefore, there is a need to fix this issue, and to fix this; you need to update your Windows 10 so that the drivers will be updated automatically.
Also Read:
Method 2 – Uninstall Network Adapter Drivers
It is another method that can also be used to fix this issue of The Default Gateway is Not Available. When you reboot Windows, you should not worry about uninstalling your network adapter drivers; It re-installs its drivers.
To uninstall the network adapter drivers, follow these steps mentioned below:
Step 1: First, Press “Windows key” along with “R,” then write “devmgmt.msc” and now press enter to open the “Device manager”.
Step 2: Now, expand the network adapters and find the name of your network adapter from the list available on the screen of your system.
Step 3: Next, always make sure to note down the name of your network adapter.
Step 4: Then right-click on your network adapter’s name and uninstall it immediately.
Step 5: After that, select “Yes” for confirmation.
Step 6: Then Restart your system to check the network connectivity.
Step 7: If you are still unable to connect to your web, then the “driver software” will not automatically install.
Step 8: For this, you may need to visit the manufacturer’s website to download the driver.
Method 3 – Change the Frequency of The Wireless Router
The latest high-tech routers can be used to support frequency up to 5GHz, but your current adapter may not be able to support up to this frequency. So, you have to change the frequency from an automatic to a specific value lower than 5GHz.
For changing the frequency, you can take help from the user manual of your router as the channel of your router can be a reason behind the occurrence of this error.
Method 4 – Change your network adapter drivers
Changing your network adapter drivers with a different set of drivers can also be used as a solution to fix this error of The Default Gateway is Not Available.
Step 1: Firstly, open the “device manager” and expand network adapters.
Step 2: Then, right-click on your network adapter and update it.
Step 3: Now, you will get two options from which you have to choose “browse my computer for driver software”.
Step 4: Next, select “Let me choose from the list of device drivers on my computer” and uncheck “Show compatible hardware“.
Step 5: Then select your network adapter driver from the list that will show “Next” and choose.
Step 6: Finally, follow all the remaining steps, and this method is done.
Method 5: Manually Assign the IP Address and Default Gateway
Step 1: To start with the first press the “Windows key” along with “X” and choose the command prompt.
Step 2: Then, write “ipconfig” and hit the enter button.
Step 3: Next, write “ipconfig” and hit enter.
Step 4: To be sure, note down the default gateway, IP address, and subnet mask, which will be listed on WiFi.
Step 5: Now, Right-click on the wireless icon and choose “Open network and sharing center“.
Step 6: After this step, select “change adapter settings,” which will display on the left-hand side menu being displayed on your screen.
Step 7: Then right-click on “Wireless Adapter Connection” and choose “Properties“, Now select “IP version 4“ and click “Properties“.
Step 8: Next, enable the “use the following IP address” and write the default gateway, IP address, and sub-net mask, which you have noted down in previous steps.
Step 9: Now, first select “Apply” and then “OK“.
Step 10: Finally, You Can Reboot Your System.
Method 6: Remove Antivirus Programs
Step 1: To start with the first press, the Windows key along with R.
Step 2: Then type “appwiz.cpl” and then hit “Enter“.
Step 3: Now select your “McAfee” program and uninstall it.
Step 4: To end this method, reboot your system.
Method 7 – Change The Power Saving Mode of The Wireless Adapter
Step 1: To begin with the first press the “Windows key” along with “S” and then enter “Power Options.”
Step 2: Now choose “power options” and try to locate your current plan to change it.
Step 3: Then select “Change advanced power settings” option available on the screen of your system.
Step 4: Next, go to “Wireless Adapter Settings” and set it to “Maximum Display.”
Step 5: At last, select “Apply,” and then click on “OK.”
Method 8 – Use “netshell” Reset Command
Step 1: First press, “Windows key” with “X” to open a command prompt.
Step 2: Now type “nets hint IP reset” at the command prompt and then hit “Enter.”
Step 3: To end this method, close the command prompt and reboot your system.
Also Read:
- Microsoft Compatibility Telemetry
- DNS_Probe_Finished_No_Internet
- Windows Has Detected An IP Address Conflict
- 0x80070035
- WLDCore.dll
Conclusion
In this article, various methods have been listed to solve The Default Gateway is Not Available error in Windows 10 Error and problems faced by users due to Default Gateway is Not Available error.
This article presents you with the best and most effective ways to solve this error easily. Hence this article increases your knowledge and skills in the field of computer science.


