Hip dips are the inwardly oriented curves under the hips and above the thighs that appear to fall under the umbrella of “body positivity.” Instead of outward curves, we have curves that point inward.
It’s very natural to have them, no matter how subtle or prominent they are. Violin hips is another name for these. Hip dips can be caused by a variety of factors. The shape of the pelvis affects hip dips. Our physical structure and fat distribution are simply depicted in these images.
There are times when the skin is stuck to the trochanter of the thigh bone and causes hip dips. Because of its position in relation to other body parts, it might vary in prominence.
Despite the fact that everyone of us has an indentation at the point of attachment when we are skeletally formed. It can also be reduced or increased by wearing different clothing.
Contents
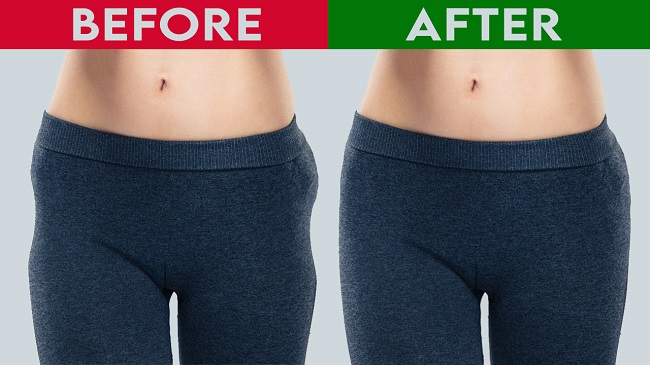
Exercising to Prevent or Reduce Hip Dip
The growth of muscle and the reduction of fat percentage can be achieved by specific activities.
To avoid injury or a lack of progress, you must practise the correct form of the exercise and get advice from someone who is knowledgeable about it.
You can practise both unilateral and bilateral exercises, but you should focus more on the latter. You can fit in the recommended workouts into your weekly routine by doing them a few times a week during your non-working days.
It’s also critical to allow yourself a rest period of one to three minutes in between sets. Preventing cramps by stretching is essential when first starting to train your body. Keeping a positive trajectory requires a high level of consistency.
Muscles are worked differently depending on the workout. The glutes and their muscles will be the focus of this section. It’s also possible to strengthen your legs and hamstrings.
To perform these exercises correctly, you must have a strong and steady core. Slow and controlled repetitions are essential.
To reach your aim, try the activities listed below:
1. Openers of the Hips from the Side
– The glutes, hips, and midsection are all worked out in this workout. Weights can be added for additional development and strength enhancement after practising proper form. It’s necessary to get into a “quadruped” position, which means bending your elbows and knees to your chest (legs bent at 90 degrees).
– Maintain a neutral spine and a straight core. Now slowly lower your right leg to the level of your hips and repeat the movement on the other side. Avoid lowering the knee to the ground.
Repeat for each leg 10-12 times.
2. Lunges from a Standing Kickback
– Quadriceps and glutes benefit from this exercise. It’s a necessity that also contributes to a healthier, more balanced physique.
– To avoid falling, keep your core firm and pay attention to your leg movements.
– Place your hands on your knees and pray.
– Elevate your right leg up to your chest in a bent position. Breathe in throughout this step. Then, exhale and raise your arms up to your ear as you return your right leg back to its starting position.
– Before you take a breather, go into the lunge and keep your foot stable to maintain balance. You should point your toes in the direction of the camera. Form a prayer position by bringing your right leg back up to your chest and bringing your hands together in prayer position.
– For each leg, perform these instructions 10-12 times. After getting the hang of the form, you can do the same exercises with your legs by holding a dumbell in each hand instead of the prayer stance mentioned above.
Make sure you do this for the other leg as well.
3. Leg Lifts on the Sides
Standing leg raises target the glutes and hips’ lateral muscles. The muscles in the inner thighs can also be slightly pumped up. Instead of bending towards the leg, you must maintain a straight and solid body. This improves efficiency.
Slow and controlled repetitions are the key to successful training. This increases the stress on the muscles and aids in the development of stronger muscles.
– Face a wall or other solid object on your left side for support.Use your left hand to stabilise yourself and keep as much balance as you can.
– To elevate your right foot and leg laterally, slowly bring your right foot and leg up to the level of your hips. While doing this, take a deep breath in and out slowly.
– As you exhale, slowly lower your right leg toward the floor. Throughout the exercises, make sure to maintain a straight core.
Repeat for each leg 10-12 times.
4. Squats
There are many muscles involved in this exercise, making it an excellent compound action. It works the legs, hips, and glutes. For further support, abdominal muscles are also involved.
While there are many other types of squats, traditional squats are performed by placing your feet slightly wider than your hips, with the soles of your feet pointing front.
The next step is to descend as if you were about to sit down, so do it slow and steady. Remember to exhale and keep your spine in a neutral position as you perform this exercise.
Stand up after taking a deep breath. You’ll be utilising the muscle power in your legs for this. Do this ten to twelve times. You can increase the weight by using dumbells or barbells.
To avoid knee injury, it is important to practise proper form before increasing the weight.
5. Side to Side
The buttocks, hips, and inner thighs all benefit from this exercise’s work on the sides of the legs.
– Standing with your feet together is a good place to start. Make sure you’re in proper squatting position. Extend your right leg out to the side while you perform this exercise.
– The next step is to bring your left foot into contact with your right foot. During this step, you have the opportunity to gain ground. Stretch your left and right legs in the same manner to meet your left leg.
– You should perform a total of 10-12 repetitions on each side before increasing the weight.
6. Lunges to the Side
A complex movement that works a vast number of muscles, the squat. It concentrates on the hips and the buttocks.
-Stand with your feet under your hips.
– Press the ground with your left foot as you extend it to the left. To stay upright, place your weight on the right foot. Bend your left leg and lower your buttocks to the ground. You’ll be able to see my right leg in this position.
– For each leg, you can repeat this 10-12 times, or you can do it on both legs at the same time. To begin, make certain that both of your feet are facing forward and are firmly planted.
Holding a dumbell in your hands will allow you to increase the resistance.
7. Curtsy Lunges on the Sides
– This exercise targets the glutes and quadriceps.You can begin by putting your feet together and stomping your feet. Make a fist with your right hand and raise your left leg towards your right side.
– Make sure your knees are practically touching the ground as you bend down at a 90-degree angle with your glutes near the ground.
– With the help of your glutes, return to the starting posture. Always remember to maintain your front foot forward and your spine neutral when performing this move.
Adding weight is as simple as holding dumbbells or a barbell.
8. Bridges of the Glutes
– This is a glute-targeting exercise. Extra support might be found in your abdominal muscles.
– In this position, your knees are bent at a 90-degree angle, and your arms are placed on each side of your torso. Position the feet slightly wider than the hips when balancing on one’s feet.
– Slowly raise your buttocks and hips. When you inhale, do this. Take a deep breath in and exhale as you lower them back down. The recommended rep range is 10-12 per set.
– Hold the posture for 30 to 45 seconds during the final rep. For a few repetitions, bring your knees together and then pull them apart once you’ve lowered yourself.
9. Donkey kicks
– Glute and hip development and elevation are aided by this unilateral workout. Bend your knees and hands beneath your shoulders in a quadruple or cat stance.
– Make sure your right leg is elongated to its fullest extent. When you inhale, do this. Keep your spine straight at all times. Abdominal muscles are an option here.
– Do not let the bottom of your foot touch the ground as you bring your leg back to its original position in the starting position. Do this for each leg 12-15 times. Keep your leg stretched out in front of you and pulse it 15 times up and down during the final rep.
– Do the same on the other side. Ankle weights can be used to increase the weight.
– Lifting the Legs While Lying Down It’s a unilateral workout that targets the buttocks and hips in the ideal way.
– Lay down on your left side with your body straight and spread out.
– Your left arm should be bent at the elbow and your palm should be on the ground to support your hand. Keep your right arm in front of your torso to provide the necessary stability.
– As high as you can, lift your right leg into the air.
– Slowly lower it before raising it again, making sure it doesn’t contact your right leg.
– This exercise targets the glutes and thighs’ outer muscles. Ankle weights can be used to enhance your progress.
– Do this a total of 12-15 times. Take care of the opposite leg in the same way.
– Keep the leg up in the air and pulse it a couple times on the last rep.
Conclusion
Hip dips are a normal aspect of human anatomy. When it comes to determining your body image, genetics play a large role. Set goals for your workouts and stick to a timetable. Change is slow, and the results won’t show up right away.
The ability to integrate the mind and body when exercising is critical to maximising performance. It’s also important to watch what you eat. Keep an eye on the prize, even if the process is slow.


