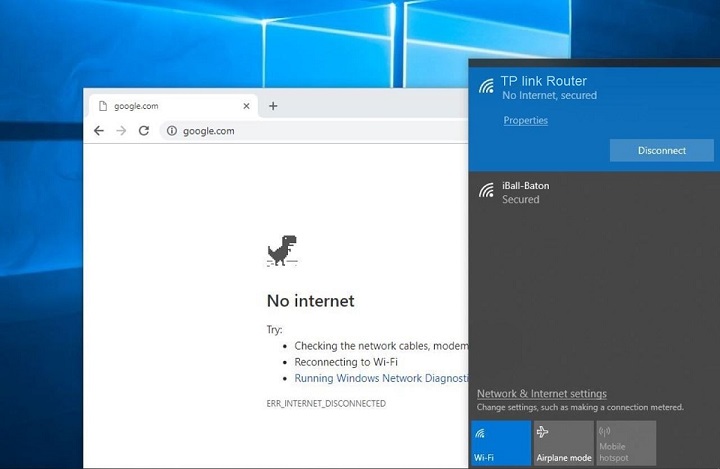
When you try to connect to the internet via Wi-Fi, you get the message “No Internet, Secured.” This post is for you if you don’t know how to fix the no internet secured Windows 10 issue. The problem is distinct from other internet issues in that you are connected to the internet via a Wi-Fi network, but the router fails to connect to the Internet, leaving you unable to access any web pages.
You’ll probably see a small yellow triangle when you check your Internet connection, which you can click to bring up the No Internet, secured error message. This problem appears to be caused by a misconfigured IP address. Because the mistake could be caused by a variety of factors, I’ve provided a list of potential solutions. Simply follow each step.
Before anything else check whether this problem occurs in only one device or in all devices. The first thing you should do is see if it’s just one device that can’t connect to the internet or if it’s a problem with numerous devices.
Your Windows 10 laptop may be the source of the problem, or it could be a problem with your access point or network. Continue reading if only one device receives the error “No internet, secured.” Skip ahead to this section if you don’t want to read the rest of the article
Contents
How To Fix ‘No Internet secured’ Problem
Because there is no one-size-fits-all solution to the Wi-Fi no internet secured problem, it is recommended that you try each of the options listed below one by one to see which one works best for you.
Check sure your Wireless adapter is working properly before attempting any of the methods listed below. Try a power recycle to run this test (switch off and then turn it on again). Start executing the offered solutions if everything is in order and no issues are discovered.
Method 1: Update the Wi-Fi Adapter Drivers if Possible.
An outdated driver may once again prevent your computer from connecting to the Internet. Let’s make sure the WiFi adapter driver is up to date.
Step 1 . Select Device Manager, Expand Network Adapters with the Windows + x keyboard shortcut.
Step 2. Under the Network adapters section, choose the network adapter that your computer is presently using, right-click it, and choose Update Driver Software.
Step 3. Wait for Windows to complete the search by clicking on Search automatically for updated driver software.
Read Also:
Method 2: Disable Wi-Fi Sharing / Wi-Fi Hotspot Software
Configuration issues in your network adapter can be caused by Wi-Fi Sharing or hotspot applications. If you’re running this type of software, try updating it first or, if that’s not possible, uninstalling it.
If the message “No internet secured” persists after the upgrade or removal, any non-Microsoft things on the network adapter must be disabled:
Step 1. Hold the Windows key and the X key together.
Step 2. Connect to the Internet
Step 3. Click Alter the adapter’s settings
Step 4. By double-clicking select your wireless network
Step 5. Choose Properties
Step 6. All non-Microsoft elements should be disabled.
Step 7. Start your computer again.
Method 3: Modify The IP Settings of Your Network
Before we modify or update anything, we need to make sure your network adapter is set up properly for a typical home or office network.
Step 1. Select Network Connections from the Start menu by right-clicking.
Step 2. Change Adapter Options
Step 3. Double-click the Wi-Fi Adapter to open the Network Adapter.
Step 4. Choose Properties
Step 5. Check the following boxes to see if they are checked:
QoS Packet Scheduler Internet Protocol Version 4 (TCP/IPv4) Client for Microsoft Networks File and Printer Sharing for Microsoft Networks
Step 6. Uncheck Internet Protocol Version 6 (TCP/IPv6) in the Microsoft LLDP Protocol Driver Link-Layer Topology Discovery Responder Link-Layer Topology Discovery Mapper I/O Driver. (Perhaps this is the source of the issue.)
Step 7. Select Internet Protocol Version 4.
Step 8. Ensure that the IP address and DNS server are set to automatically obtain.
Close the properties window and check to see if the no internet access error has vanished.
Method 4: Reset Network
The network reset tool in Windows 10 restores the network configuration to its default settings. And if the problem is caused by an inaccurate setting, this is likely to be very useful.
Step 1. When you search for Network Reset and click on the first result
Step 2. A new box will pop up informing you about what will happen if your network is reset.
Step 3. To reset the network and your computer, click the “Reset now” option.
Method 5: Set A Fixed DNS Server
The DNS server is usually the source of the issue. The DNS server is in charge of converting domain names into IP addresses. You can’t connect to the internet without a functioning DNS server.
Step 1. Select Internet Protocol Version 4 (TCP/IPv4)
Step 2. Check to Use the DNS server addresses listed below.
Step 3. Enter the IP address listed below.
Step 4. 1.1.1.1 is the preferred DNS server.
Step 5. 1.0.0.1 is an alternative DNS server.
Step 6. Check to see whether the No internet secured error has been resolved by clicking Ok.
Read Also:
Conclusion
Well, no internet secured Windows 10 is a widespread issue that most Windows 10 users are experiencing and reporting on a regular basis. So I did my best to compile a comprehensive list of solutions to the internet problem.
It is hoped that now that you have applied the above-mentioned solutions, your PC is connected to the internet and your wifi is operational. All of the remedies are effective, and as a result, they may totally address wifi no internet security.
")


