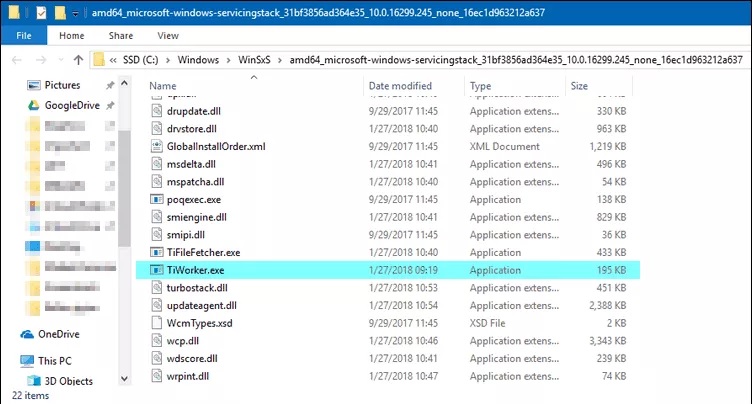
We have all faced a problem where your computer or laptop is running slowly. And when you look into this problem in Task Manager you may find that “TiWorker.exe” or the “Windows Modules Installer Worker” is causing the problem.
You will realize that it is using too many system resources, Resulting in high Disk and CPU usage. You might be wondering what “TiWorker.exe” also known as “Windows Modules Installer Worker” exactly is?! It is basically a system process related to “Windows Update”.
It regulates the installation and removal of Windows system Updates. “TiWorker.exe” usually takes up some system resources in the background, while the operating system is downloading and installing any updates or even when you are running Windows Update.
Contents
TiWorker.exe High Disk Usage On Windows 10
Also, keep in mind that when you are using Windows 10 TiWorker.exe causes high disk or CPU usage from time and again as Windows 10 automatically install the updates regularly using the Windows Update. Thus, the time-to-time slowdowns by TiWorker.exe is deemed normal.

Nonetheless, if TiWorker.exe frequently causes your computer to slow down and use too much CPU or disk, that is to be considered an abnormal situation. Problems typically arise from Windows Update, but sometimes they’re caused by damaged files or outdated drivers.
TiWorker.exe is an application that can cause your Windows 10 computer to use a high amount of disk space. Here are some ways you can fix this.
Read Also:
Install All Available Updates
TiWorker.exe will not consume too much resource if you install all available updates.
Step 1. Go to “Start” menu and click on “Settings”.
Step 2. In Settings click on “Update and Security”.
Step 3. Now select “Check for Updates” and if there are any updates available, download and install them.
Run Windows Update Troubleshooter
When you seem to have any issues with the Window Update, you can simply Run Windows Update Troubleshooter.
Step 1. To open the Run dialog box, press the ‘Windows logo key’ and the ‘R key’ simultaneously on your keyboard.
Step 2. In this dialog, type “control” and select “OK”.
Step 3. In the control panel select “Troubleshooting”.
Step 4. Under “System and Security”, click “Fix problems with Windows Update”.
Step 5. Run Windows Update troubleshooting using the instructions displayed in the pop-up window.
Restart Windows Update Service
You can follow the steps below to reset Windows Update and that will get it back to normal.
Step 1. To open the Run dialog box, press the ‘Windows logo key’ and the ‘R key’ simultaneously on your keyboard.
Step 2. In this dialog, type “services.msc” and click on “OK”.
Step 3. From the list shown, select “Window Update” via a single click and then click on “Restart” in the upper left corner of the screen.
Clear Windows Update Data
Sometimes Windows Update stores the downloaded file in a folder known as ‘SoftwareDistribution’ and if the files saved here are corrupted it may cause problems in Windows Update, including TiWorker.exe with high CPU and disk usage.
Here are some steps to solve this problem.
Step 1. To open the Run dialog box, press the ‘Windows logo key’ and the ‘R key’ simultaneously on your keyboard.
Step 2. In this dialog, type “services.msc” and click on “OK”.
Step 3. From the list shown, select “Window Update” via a single click and then click on “Stop” in the upper left corner of the screen.
Step 4. Go to “File Explorer” and then go to “C:\Windows”.
Step 5. Find the “SoftwareDistribution” folder and click “Delete”
Step 6. TiWorker.exe should have calmed down by now if you “Restart” your computer.
Run SFC Scan
There is also a possibility that there may be corrupt files in your computer, which may be causing your computer to slow down. To solve this problem, you can run SFC Scan to know whether there is any problem in the files or other services on your computer.
Step 1. Right click on “Windows Logo” on taskbar on the bottom right side of the screen.
Step 2. Now select “Windows PowerShell (Admin)” from the menu that popped-up.
Step 3. Type “sfc/scannow” in Command Prompt or PowerShell.
Step 4. Press “Enter” and wait for the scan to complete.
Step 5. After the scan is completed, “Reboot” your computer, and see if the problem is solved.
Use DISM Tool
There is also an option to use Windows built-in DISM Tool, which will help you to fix update problems as well as it will help you to resolve the problem.
Step 1. Right click on “Windows Logo” on taskbar on the bottom right side of the screen.
Step 2. Now select “Windows PowerShell (Admin)” from the menu that popped-up.
Step 3. Type “dism.exe /online /cleanup-image /restorehealth” in Command Prompt or PowerShell.
Step 4. Press “Enter” and wait for the process to complete.
Step 5. After the process is completed, “Reboot” your computer, and see if the problem is solved.
Read Also:
Conclusion
In this article above we can find easy steps to follow to solve the problem where your computer or laptop is running slowly. By following these easy and different methods, we can make sure that our computer or laptop works just fine after any update and relatively at a good speed.

![WLDCore.dll is Missing Error in Windows 10 [RESOLVED] WLDCore.dll is Missing Error](https://howandwow.info/wp-content/uploads/2019/09/WLDCore.dll-is-Missing-Error.jpg)


![DNS_Probe_Finished_No_Internet Error [RESOLVED] Fix DNS_Probe_Finished_No_Internet Error](https://howandwow.info/wp-content/uploads/2019/09/Fix-DNS_Probe_Finished_No_Internet-Error.jpg)
![Err_Connection_Reset Error in Chrome [RESOLVED] Fix Err_Connection_Reset Error in Google Chrome](https://howandwow.info/wp-content/uploads/2019/09/Fix-Err_Connection_Reset-Error-in-Google-Chrome.jpg)
![Err_Cache_Miss in Google Chrome Error [RESOLVED] Err_Cache_Miss in Google Chrome Error](https://howandwow.info/wp-content/uploads/2019/08/How-to-Fix-Confirm-Form-Resubmission-Error.jpg)


![Steam Missing File Privileges Error [RESOLVED] How to Fix Steam Missing File Privileges](https://howandwow.info/wp-content/uploads/2020/07/How-to-Fix-Steam-Missing-File-Privileges-Error-100x70.jpg)

![SIM Not Provisioned MM#2 Error [RESOLVED] SIM Not Provisioned MM#2](https://howandwow.info/wp-content/uploads/2020/03/SIM-Not-Provisioned-MM2.jpg)


