System Interrupts are typically the warnings that reach CPU regarding hardware errors. It looks similar to an Operating System process, while it is not. System Interrupts can take high CPU, and this might cause a problem.
You have to note the fact that it is not a malware or virus, but an alert to the processing system about errors related to hardware. System Interrupts is an official component of Windows and usually situates in the System32 folder.
This article aims at shedding light on what System Interrupts is and how to fix System Interrupts High CPU and Disk usages.
Contents
What is System Interrupts?
System Interrupts is an official component of the Windows Operating System and acts as an intermediary between hardware components and the processor. It sends alerts to the CPU if there are any issues in the hardware parts of the system.
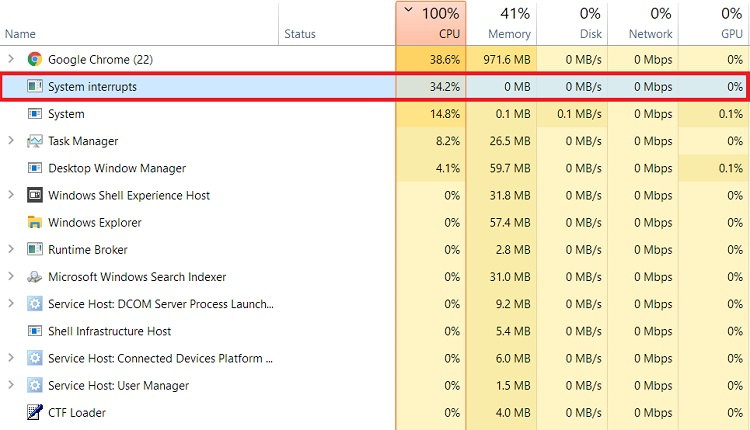
It appears as a process in the Task Manager. Whenever an error occurs in hardware, System Interrupts reach the CPU as a warning message. CPU then stops the work it had been doing and works on the issue.
After the job is over and the error cleared, it resumes its work. However, the problem arises when such interruptions occur frequently and overload your CPU (Central Processing Unit). You should never disable or deactivate System Interrupts.
Such an action can leave your system in complete damage. Hardware interrupts is a major component of any system, and they help to effectively run the system and carry out different activities at the same time.
In a computer system, there are hundreds of programs running simultaneously. When an issue occurs in the middle of this process, Interrupts sends alert to the processor and suspends all other actions. This will not cause any data loss as the CPU saves the progress of all the actions until that time.
How to Fix System Interrupts High CPU in Windows 10
Even though your device needs System Interrupts, its normal rate is below 3%. If the rate hikes up to 20% or above that, it can cause problems to your PC. The problem can arise out of hardware or driver issues.
If the problem is not a major one, you might be able to solve it by rebooting your PC. Another first-hand option is to restart the system and check if the System Interrupts High CPU issue shows up again.
Sometimes, the problem can be more complex, and you can notice high CPU usage. Even in such cases, it is hard to determine which hardware is causing trouble. Therefore, fixing the issue might take time and patience.
Nevertheless, there are multiple methods to solve System Interrupts High CPU error. The methods to fix System Interrupts are given below, according to the increasing level of complexity:
Method 1 – Troubleshoot Device and Driver
You have to assume that faulty drivers might be the reason for the issue. Excepting a few software, damaged drivers or devices commonly cause System Interrupts High CPU. In case none of the previous procedures helps solve the problem, you have to diagnose which driver is causing the issue.
It is better to begin with disconnecting your system’s external devices and then move on to the internal devices. Also, remember to update each driver during the process.
Step 1: Begin disconnecting each external device on your system, including the keyboard, mouse, external Bluetooth, and WiFi devices. Each time you disconnect a device, check the CPU usage for a few minutes. If the user stays the same, continue to disconnect the devices. But if there is a notable reduction in CPU’s usage (2-3%), it means, that is the device causing the problem.
Step 2: If you did not detect any faulty external components, you could start disconnecting your internal devices using the device manager.
Step 3: Press Windows + R and type “MSC” and click Enter.
Step 4: When the device manager opens, select devices such as sound cards and network adapters and disable them one by one. Check if the CPU usage reduces more than 20% to detect the faulty software.
Step 5: After the above procedure is complete, you have to update all device drivers on your system. For this, right-click on the device, select “Update device driver,” and click on “Browse my computer for driver software.”
Also More:
- IDP.Generic Virus Warning
- Discord Overlay Not Working
- SIM Not Provisioned MM#2
- A Problem Has Occurred in Bitdefender Threat Scanner
Method 2 – Disable the Wake on Magic Packet
Windows provides a feature that enables your network adapter the permission to wake your computer system up while transmitting data. This data packet is referred to as “Wake on Magic Packet.”
This data packet can cause problems as it triggers high usage of CPU, and it sends many interrupts, resulting in major issues for the system. You could disable Wake on Magic Packet by changing your system’s Settings and can enable it again if this did not cause the issue.
Step 1: Press Windows + R to start Run. In the dialog box that appears, type “MSC” and press the Enter button.
Step 2: The device manager opens, and all the devices connected to your system will appear listed under categories—select Network Adapters from the drop-down list.
Step 3: Choose your WiFi device, right-click on it, and click on Properties.
Step 4: Go to the Advanced tab. Navigate through the options and look for “Wake on Magic Packet“.
Step 5: Click on Wake on Magic Packet and disable the property. Finally, save the changes and leave the page. After finishing this procedure, restart your system and see if there are any changes to the issue.
Method 3 – Install Intel Rapid Storage Technology
Intel Rapid Storage Technology improves the level of performance and responsiveness for devices using SATA disks for desktop, mobile, and server platforms. It is an application based on Windows OS and enhances the performance of the system by reducing power usage.
If you are using multiple disks, it keeps you on the safer side, as there will not be data loss during disk damages and failures. In some cases, users tried using Intel Rapid Storage Technology to reduce high CPU usage and succeeded.
Therefore, installing this is an advisable option, at least to see if it solves the problem. Before installing this module, you have to understand that it replaces the SATA controller driver of your PC.
The installation process is not complex and can be done within a few steps. If you are confident enough to do it without professional help, you can install the module from the official website of Intel.
Method 4 – Turn Off Fast Startup
Fast Startup in Windows 10 is a special property to lessen the time the system takes to boot up from being completely shut down. It restricts the system from its normal shut down and can cause compatibility problems with parts that do not support hibernation or sleep mode.
Fast Startup is similar to cold shut down and hybrid sleep mode of earlier versions of Windows. When you shut down the system, the condition of Windows is similar to the one when the system is booted up.
In both these states, the system logs out all the users and closes all the applications. Nevertheless, when you boot up the device, the system session will be running, and the kernel will be loaded up.
After this, Windows sends an alert to drivers to be ready for hibernation and saves the current system state to hibernation and turns of the system. Then as you restart the PC, Windows does not require loading the kernel, drivers, or the system state again.
It can just refresh your system’s RAM (Random Access Memory) with the loaded image in the hibernation file and take you to the startup screen. Some people noticed that, after disabling this feature, their System Interrupts high CPU problem has solved.
Hence, you can disable this feature and check if the issue disappears. Follow the steps given below to disable fast startup:
Step 1: Press Window + R to initiate Run. In the dialog box that appears, type “Control Panel” and press Enter. This will open your system’s control panel.
Step 2: Select Power Options from the control panel.
Step 3: From the left side of the screen, tap on “Choose what the power buttons do.”
Step 4: Then, click on the option “Change Settings that are currently unavailable” for enabling administrative privileges
Step 5: Under Shut down settings, deselect the option that says, “Turn on fast startup.” Do not forget to save the changes before exiting.
Step 6: Finally, restart the system and check if the System Interrupts High CPU problem is still present.
Method 5 – Disabling USB Root Hub
The USB Root Hub is a software driver and not the hardware that you plug into a USB port. This software allows you to connect numerous USB peripherals to your system. Almost all devices have numerous USB Root Hubs that help you share the data bus with multiple systems.
USB hardware can cause system interruptions in your computer. If such a case happens, you can disable USB Root Hubs from the device manager to resolve the issue. To disable the USB root hub that your keyboard and mouse are not using currently, you have to find out which root hubs they are using.
Therefore, your initial step is to find the root hubs the external devices need and then deactivate all the other root hubs that are additional. The steps to carry out this procedure are as follows:
Step 1: Press Windows + R and type msc and hit on the Enter key.
Step 2: Find the Universal Bus Controllers and expand the dialog box. Then, navigate through all the root hubs listed.
Step 3: Right-click on a root hub and click on Properties.
Step 4: Under Properties, select the tab titled Power and see if your external components are attached there. If your keyboard and mouse were using this root hub, they would show up in the list. If your devices are listed under “Attached devices,” it means they use this particular root hub. Therefore, you can deactivate all the remaining root hubs by excluding this alone.
Step 5: After this, right-click on all the USB Root Hubs, excluding the ones used by your keyboard and mouse. Then, click on Disable.
Step 6: Finally, reboot your system and check if the issue is still present. If the problem is still there, that means the USB Root Hubs did not cause it. In such cases, you can reverse all the modifications by enabling the root hubs again.
Method 6 – Disabling Audio Enhancements
Some sound drivers use intensifiers to increase the sound quality of the system. In an attempt to improve the audio system, they use some properties that the system might not adapt. This can end up in the over usage of CPU and result in System Interrupts.
You can disable the sound enhancements to see if that causes any change to the issue. This does not function in all kinds of sound drivers. Some have their Enhancements tab named something else. Therefore, in such cases, it is advisable to disable all effects of the audio.
The “Exclusive mode” provided in certain audio drivers cause problems as they permit other applications to manage your sound card. This may not cause the issue, but it is always better to try to see if there are any changes.
Step 1: Press Windows + R to initiate Run.
Step 2: Type Control Panel in the dialog box that appears and click Enter.
Step 3: Go to the search bar on top of the screen and type sound, which would take you to sound options.
Step 4: After the sound options are open, click on the audio device connected to your PC. Then, right-click and open Properties.
Step 5: Navigate to the Enhancements tab and disable all enhancements.
Step 6: Click on the Advanced tab and deselect the Exclusive mode that allows applications to take control of audio settings.
Step 7: Finally, save the alterations and click on exit. If the System Interrupts High CPU problem continues after this, you can reverse these steps.
Read More:
Conclusion
System Interrupts happen when there is a problem in any of the hardware attached to the system. Even though such interrupts are helpful for the system’s functioning, if it hikes up and overloads the CPU, it becomes a serious issue.
This article provides you with some of the most efficient methods to solve the System Interrupts high CPU usage issue. I hope you find this helpful.


