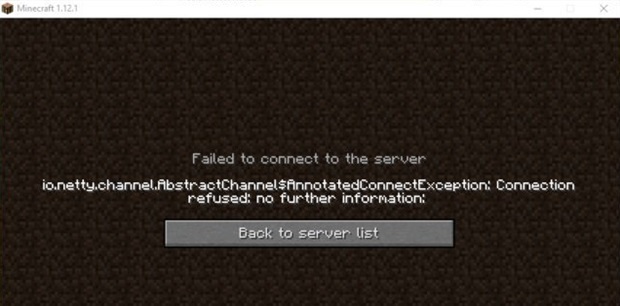
Minecraft has gained so much popularity in the online game community, with a huge number of 91 million players all across the world. This number defines the monthly logging in players. About Minecraft, we can say, one of the largest platforms out there and counting. However, many users reported about the error they were encountering while their attempt to connect to a server. “io.netty.channel.AbstractChannel$AnnotatedConnectException: Connection refused: no further information” error does not limit itself to a single server but stays across all of them.
Contents
What Causes the io.netty.channel.AbstractChannel$AnnotatedConnectException: Error?
Thereafter, receiving so many reports pointing towards the same issue from multiple of the users, we were compelled to find the reasons behind this error as soon as possible. Here are the reasons which gave birth to this error. Read them carefully so that you can proceed to resolve the issue, at ease.
1. Firewall
In order to connect the game properly to the server, you should include all the game directories, as well as the Java files, in the exclusion list of the Windows Firewall. Because there can be a scenario where the Windows Firewall that is used by you, might be causing the blockage in the establishment of the connection to the server.
2. Incompatible Software
Minecraft has an official list of incompatible software for the game. These can cause conflicts and create issues if they are downloaded and installed on the system from which you are trying to establish a connection with the server.
3. IP Address Issue
There is a situation that gives rise to this error is the wrong IP address or the listed port while attempting to establish a connection with the server. Until you use a static IP address, which is rare as the IP address given to you through the ISP quite often changes, time to time. It may lead to the allocation of the same IP address to multiple users. Thus, you need to change the IP address timely. The reason behind being is that the IP address, as well as the genuine port, is used while forwarding the connection to the server. And then, the server approves to establish the connection successfully.
4. Outdated Java
If the Java on the system is outdated while the launcher is equipped with the latest version, it may give rise to the conflicts with certain items of the game. Thus, it prevents the smooth connection with the server. So, Minecraft is required to have an updated version of Java software to work efficiently.
How To Solve “io.netty.channel.AbstractChannel$AnnotatedConnectException: Connection refused: no further information” Error on Minecraft
You have reached here with the knowledge of the reasons behind io.netty.channel.AbstractChannel$AnnotatedConnectException error. Now, go through the solutions in sequence to avoid any sort of hurdles in your way.
Method 1 – Reset Internet
The IP address provided by the ISP is edited. Whenever your internet router is reset unless a static IP address is used by you. Here in these steps, we are reinitializing the DNS cache and the internet settings by power cycling the Internet Router, completely. Follow these steps:
Step 1: Power disconnection from the internet router.
Step 2: Reconnect the power connection after waiting for 5 minutes.
Step 3: Try to establish a connection with the server when you get internet access. Now check whether the problem persists.
Method 2 – Restart Your Modem or Router
Your Internet Modem/ router may cause you problems. It is then when this error “io.netty.channel.AbstractChannel$AnnotatedConnectException: Connection refused: no further information” comes into your notice. To resolve this in Minecraft, follow these steps:
Step 1: Try to power off your Router for 5 minutes. Now, power back on to start the router again.
Step 2: If this power-off process does not work, try to reset all the settings of the router and set it up from the fresh.
These steps might help you to fix the Minecraft server connection very well.
Method 3 – Add Exception in Firewall
As discussed earlier, there can be a possibility that the Windows Firewall, you are using, might be causing the blockage in the establishment of your connection with the server. Hence, these are the steps to add an exception in the Firewall for some of the executables from the Minecraft Folder that need internet access. Follow these steps:
Step 1: Click the Start menu and then choose the Settings icon.
Step 2: From the Settings, click on the Updates & Security option.
Step 3: From the left side, choose “Windows Security.” Now choose the “Firewall & Network Protection” option.
Step 4: Move down through scrolling and select the “Allow an App through Firewall” option.
Step 5: Click on “Change Settings” and choose “Yes” from the warning prompt.
Step 6: Choose the “Allow another app” from the options provided and then click on “Browse.”
Step 7: Navigate through the game installation directory and choose the game as well as the launcher executable.
Step 8: Repeat the above process again and, at this time, navigate through the directory where the Minecraft servers have been installed by you.
Step 9: Launch the “Maxwell” folder, followed by the “Minecraft Server” folder.
Step 10: Allow all the Java executables located inside the folder in the very same way.
Step 11: Repeat the process all over again, and now instead of clicking “Allow another app” after choosing the “Change” option, just scroll down the list provided of the apps available currently. Now permit all the “Java Platform SE Binary” options by both the “Private” and “Public” networks.
Step 12: Finally, open the Minecraft launcher and try to establish a connection with the server. See whether the error still persists or not.
Method 4 – Add the IP Address and Port
IP address changes every two to three days if you are not using the static one. You will encounter this when your Internet Connection is reset. Here, through these steps, we will check the IP address as well as the genuine port for the game. And then add them to the Minecraft Launcher. So, follow these steps carefully:
Step 1: Click on the search bar from the Windows toolbar and then type “Command Prompt” in it.
Step 2: Right-click on the icon and choose “Run as Administrator.”
Step 3: Type “ipconfig” and then note down the “IPV4 Address“.
Step 4: Now, Navigate through the “Minecraft Servers folders à Maxwell (some random numbers) à Minecraft Server.” Open the “Server Properties” text document.
Step 5: Now note down the “Server Port” displaying on the screen. It is “25565” in this case, and it should be similar across all the cases. However, it might be different in some cases.
Step 6: Now, open the Minecraft and start navigating to the “Play Multiplayer” option.
Step 7: Choose the server with which you want to establish the connection by clicking on it. Now choose “Edit” from the options provided below.
Step 8: The name of the server could be according to your preference. The “Address” needs to be IPV4 address, as we noted. The port number such as “XXX.XXX.X.X:25565” in which “25565” is the port number, and it might vary.
Step 9: Click on the “Done.” Then click “Refresh.” Now check whether the error still persists.
There is some sort of applications that are usually not compatible with certain items of the Minecraft. They may cause errors. The following lists are available in the Minecraft from where you can find out. If they are downloaded or installed on the system from which the server is running, you will face this error in the game continuously.
Method 5 – Uninstall Conflicting Software
Some of the software hampers the normal working of the Minecraft servers. One among them being the Virtual Ethernet with Hamachi. To be on the safe side, and avoid any further error occurrence, follow these steps to delete or disable the software.
Step 1: Type “ipconfig” on the command prompt. A configuration with the name Virtual Ethernet Connection with Hamachi appears. Please note down all the addresses.
Step2: Now, reach the Search Panel to delete Virtual Ethernet Connection with Hamachi.
Step 3: Then, add your respective port number and the IP address to the Minecraft server. Now, resolve the Minecraft io.netty issues.
Step 4: To know how to add the IP address and the port number to your Minecraft server, move on towards the next step.
Method 6 – Use the Right VPN
In case, Minecraft is banned across your region, and you can use Minecraft Servers. Else, try using the trusted VPN services. They will not block the Minecraft server for you. Just changing the region may also help you to overcome this error called “io.netty.channel.AbstractChannel$AnnotatedConnectException: Connection refused: no further information”.
Method 7 – Reinstall Minecraft
You can use this solution when you ca corrupt Game Data that causes a lot of problems like the “io.netty.channel.AbstractChannel$AnnotatedConnection timed out error. Uninstalling the Minecraft and just installing it on a fresh note, helps you to fix this particular error.
How to Uninstall the Minecraft?
To do so, follow the steps below:
Step 1: Navigate to Control panel à uninstall a Program à Select Minecraft to Uninstall.
Step 2: Now, you need to install the latest version of Minecraft to fix the error “io.netty.channel.AbstractChannel$AnnotatedConnectException: Connection refused: no further information”.
From where can you download Minecraft for PC?
You can download it from Minecraft’s official website, which is minecraft.net.
Frequently Asked Questions
Question 1: How to Fix io.netty.channel.AbstractChannel$AnnotatedConnectException: Connection refused: no further information?
Answer: You can fix the Minecraft error io.netty.channel.abstractchannel$annotatedconnectexception by adding a new IP address, adding exceptions to the firewall settings, and also by using Third-party apps like VPN.
Question 2: How can I start my own Minecraft Server?
Answer: Follow these steps to start your own Minecraft Server:
Step 1: Download and start installing the updated version of JAVA.
Step 2: Followed by download and installation of the updated version of Minecraft Server Software.
Step 3: Configure the Minecraft Network at once after you have installed the software.
Step 4: Now, at last, start the server and check its accessibility too.
Question 3: How to let Minecraft bypass Windows Firewall?
Answer: Go to the method 3 to bypass the Windows Firewall.
Read More:
- Vulkan Runtime Libraries
- Avast Service High CPU Usage
- Steam Disk Write Error
- System Interrupts High CPU Usage
Conclusion
io.netty.channel.AbstractChannel$AnnotatedConnectException error has been the biggest problem for the users of Minecraft. If you resolved the failure to establish a connection with the server once, you would not be facing this error again. You will get the result in your favor. If the above solutions are not working for the error, we advise you to fix the LAN card. It can disappear the error. And never forget, we are just one click far to help you through all fair means.


