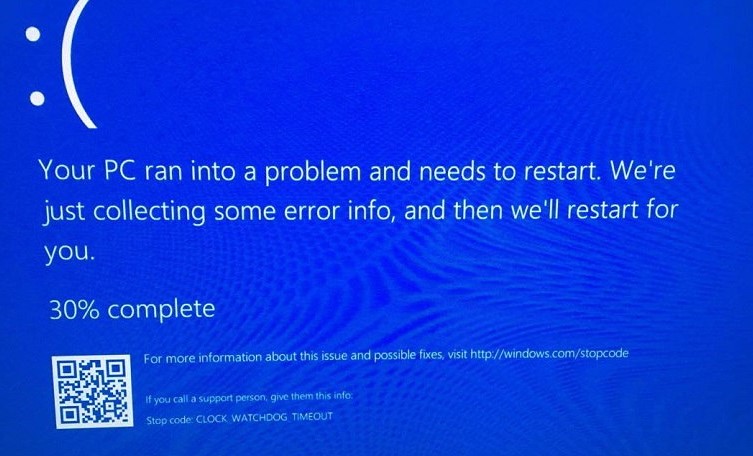
It is indeed not pleasant when your computer screen turns blue all of a sudden while you are working on something important. Then the device shows an error warning that says Clock Watchdog Timeout. Deadly serious as it seems, this is called the Blue Screen Of Death, or simply BSOD.
Just as soon as the warning pops up, the device turns itself down and restarts. This may lead to the loss of some important documents that you were working on at the time, as the files are highly prone to become corrupt.
Such an error requires complete rebooting, which further causes trouble. Nevertheless, this fatal error has multiple solutions. This article aims to give a detailed picture of the causes and solutions to this problem.
Read Also:
Contents
What is CLOCK_WATCHDOG_TIMEOUT?
BSOD or the Blue Screen of Death refers to the screen that appears when a serious error occurs on your device. This message makes the computer freeze and demands an overall reboot to make it work again.
The PC is unable to handle the error and gives a warning before automatically restarting. Importantly, the real problem arises when BSOD often occurs, making it impossible to work on your computer normally.
If you are operating on some important files while the error occurs, it is probable that you will lose those files when the system restarts. As BSODs usually come out of nowhere, the user will not be prepared to encounter trouble.
It simply leaves the user confused with his valuable data lost forever. BSOD can occur because of many reasons and require a proper diagnosis to find out the exact reason. The probable causes include overheating, overload or overclocking faulty RAM or hard disk, and unsuitable drivers.
It can also cause changes in the registry or by the attack of malware. Improper shutdown of the system, including forceful shutdown, can also be the reason. If the problem is because of faulty hardware, you have to repair or replace the hardware.
This demands further detection of the dump files. On the other hand, if the problem occurred due to software, you have to fix or remove or upgrade the faulty software.
How to Fix Clock Watchdog Timeout in Windows 10
Even if the issue seems fatal, there are numerous ways to fix it. These are some effective methods to find a way out of Clock Watchdog Timeout problem:
Solution 1: Stop Overclocking Your CPU
Firstly, you have to understand that this BSOD is commonly caused when the processor has problems. Therefore, you must consider checking if your CPU is overclocked. Overclocking means setting the frequency and speed of your processor to a higher value, which is more than the factory settings.
Almost all processors have a set speed grade. Pushing this grade further can result in an amusing speed boost, but the process is highly risky. However, you have to do it carefully as it can cause overheating that may even put the system on flames.
It can cause permanent damage to your PC and nullify warranties. Modifying your processor’s rate and frequency to its normal range depends primarily on the software you used to overclock in the beginning.
While Intel and AMD provide their own applications for users to overclock the processor, there are many available to select from. The first solution is to stop overclocking the device and check if the BSOD shows up again.
Solution 2: External Devices and Drivers
If the drivers are outdated and external devices such as a keyboard, mouse, printer, or webcam is wrongly configured, it can lead to system instability. In fact, this is the most common cause of BSOD errors.
If the external devices are under damage, the error keeps recurring very frequently. However, this can be fixed easily with the following steps:
Step 1: Firstly, open the Start menu and search for Device Manager in the Search bar.
Step 2: Then, open the Device Manager and click on View.
Step 3: Enable permission for the option “Show hidden devices”.
Step 4: Scan the Device Manager for devices with error warnings near their name.
Step 5: Click on the arrow near their name to expand the menu and continue searching.
Step 6: In almost all the hardware-caused BSODs, the problem lies in the Universal Serial Bus controllers with an error that says Unknown USB Device (Device Descriptor Request Failed).
Step 7: Turn off your system and remove all USB devices one after the other.
Step 8: While you remove the hardware piece that caused the BSOD, the error previously shown would disappear.
Step 9: If the error does not disappear, reconnect all the devices and disable the “Show hidden devices” option. Then, check if the Unknown USB Device is showing. If it shows, disconnect devices one after the other until it disappears.
Step 10: By doing this, you can understand which hardware causes trouble.
Step 11: Disconnect the faulty hardware and locate it in the USB controller. Then, right-click on it and choose Uninstall.
Step 11: Finally, restart your PC and see if the Clock Watchdog Timeout issue is fixed.
Solution 3: Switching Your Sounds to External Speakers
If you are using a device with both internal and external speakers, an issue is probable to occur when Windows switches between the two pairs. Problems may arise while the speakers are swapped, but this can be solved easily.
But after disconnecting the other pair, you may not be able to use the internal speakers. To solve this issue, follow these steps:
Step 1: First, open your taskbar and right-click on the Volume Then, select Playback devices.
Step 2: Stay in the Playback tab to get the sound settings open.
Step 3: Right-click on the pair of speakers you want to disable and hit the Disable.
Step 4: Before this, you have to make sure that the other speaker is working. If not, with both the disabled speakers, you will not be able to play sound.
Step 5: Lastly, restart the system and see if the Clock Watchdog Timeout problem is still present.
Solution 4: Update BIOS
BIOS or Basic Input Output System is the program a microprocessor uses to get the system started. This embedded software on the motherboard is the first software the system loads.
Therefore, it can use all connected devices such as a mouse, keyboard, and CD drive from the moment you turn on your PC. In case there is instability in your BIOS settings, it restricts your computer from performing normally.
For such occasions, you have to try updating BIOS, which can help you deal with most of the issues related to it and make the system function better. To update BIOS, follow the steps given below:
Step 1: Primarily, you have to know which version of BIOS is currently working in the system. To know this, go to Start menu and search for msinfo in the Search
Step 2: Check your BIOS version just below the Processor model and copy it for future reference.
Step 3: You have to know whether your system was pre-built or gathered manually by combining individual components. This information is required because if your BIOS is made for one particular component, it will not suit other devices. If you rewrite BIOS with a wrong one, it leads to other serious complications.
Step 4: Get your computer ready for the update. If your system is a laptop, make sure that the battery is full and plug it to charge to avoid risks. If it is a computer, use an Uninterruptible Power Supply (UPS) to ascertain that the system does not turn off during the process. Make sure the system does not run out of charge during the update.
Step 5: The steps for installing BIOS for different desktop manufacturers vary. You have to check with your manufacturer’s website and update the system accordingly. You have to enter your model number and select the option to start the BIOS update.
Solution 5: Check to See If Your CPU is Faulty
If the Central Processing Unit is under damage and keeps showing errors, you have to repair or replace it. Having a faulty CPU can cause damage to the system as a whole. Therefore, to make your PC work normally, check and see if the CPU is in perfect condition.
It is advisable to look for professional aid if you have doubts about this. Get an IT professional who can diagnose if there is something wrong with the unit. If the unit has to get a replacement, ask for the model that best suits your system.
Solution 6: Providing A Kernel Memory Dump
The Kernel Memory Dump holds the memory in use by the kernel while the system undergoes a crash. It is only about one-third the size of the system’s physical memory. IT experts can read Kernel Memory Dump with a Windows debugger’s help, which shows where the error is.
Follow the instructions below to work this solution:
Step 1: Search for Command Prompt in the search bar and right-click on it. Then, select the Run as administrator
Step 2: A command that says exe/standard/all appears. Copy and paste the command in the Command Prompt and click Enter.
Step 3: This will activate the BSOD and keep a log file as a Minidump folder in Local disk C.
Step 4: Download the SDK file from the WinDbg section that says Get Debugging Tools for Windows.
Step 5: If you do not want anything other than debugging tools, make sure that you have deselected every other option.
Step 6: Install the tool under the name of windbg. Then, locate the tool and run it.
Step 7: Open Crash Dump from File and find the minidump file from Local disk C.
Step 8: Towards the bottom of this file, look for the line that says “Probably caused by”. This is a sign, which shows the driver that probably causes the trouble.
Step 9: Open the Device Manager and uninstall this driver by clicking on Uninstall device
Step 10: If you want to save time, you can update it by selecting the Update driver button.
Solution 7: Resetting BIOS to Default
If your Basic Input Output System is up to date or are not confident enough to install it yourself, you can just reset BIOS to its default settings.
In cases where you are not sure how to install BIOS, it is advisable not to attempt anything carelessly that would leave your system in further damage.
Step 1: Firstly, restart your computer and open BIOS by clicking F8. You have to be familiar with the control keys because you cannot use a mouse in BIOS.
Step 2: Press F9 to Setup defaults and click the enter button.
Step 3: If it does not work, go to the Exit tab and choose Load Setup Defaults. Then, click on the enter key.
Step 4: Select the Exit Saving Changes option and let your system boot.
Step 5: Check and see if the Blue Screen Of Death appears again.
Solution 8: Uninstall Virtual Image Managers
Virtual image programs such as Daemon Tools and Alcohol 120% make optical and virtual disks. Most of these tools have a link to BSOD. Therefore, it is safer to uninstall them if a BSOD problem arises or to replace the existing one with an alternative.
To uninstall virtual image managers, follow these steps:
Step 1: From the Start menu, open Settings.
Step 2: Click on the Apps section and locate the program you wish to uninstall. Then, click on uninstall.
Step 3: Instructions will appear on the screen. Follow the instructions to complete the process.
Solution 9: Prevent Your PC From Overheating
Overheating is one of the main problems for systems crashing down. If you run the PC for a long time with a weak cooling system, it will likely freeze or crash down.
Step 1: The initial measure to reduce overheating is to give the system room to get air. Remove things around the system that restricts airflow.
Step 2: Clean the internal fans of your computer, which might be dusty.
Step 3: Replace CPU’s internal fan with a new and powerful one.
Step 4: Avoid overclocking the system that causes your PC to overheat.
Step 5: If the heat build-up is uncontrollably high, install a water cooling kit.
Read Also:
Conclusion
Blue Screen of Death screen in undoubtedly irksome, especially when we are working on something important. More annoyingly, you may lose your valuable files once the system restarts.
BSODs can occur because of a number of reasons, and there are numerous ways to solve Clock Watchdog Timeout as well. You can try most of the solutions on your own, even without professional support.
In this article, I have attempted to explain each solution in detail. I hope this has been helpful to you.


