A huge section of computer users has Windows as their Operating System, and for a good reason. It offers a wide variety of tools, features, applications, and is fascinatingly user-friendly, but it also has its share of Errors.
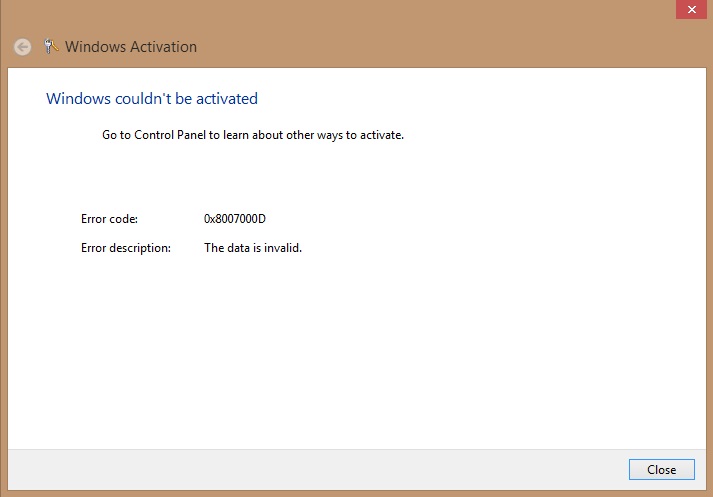
One such error is the ‘Error Code 0x8007000D‘ in Windows 10. This error occurs when the Windows update is trying to access a file that has been deleted or corrupted; or due to damaged drivers.
Either way, Error Code 0x8007000D does not allow you to install updates for drivers or Windows, or upgrade them. Whenever you try to download any update, the task just won’t be complete. However, there are methods to solve this error, and here we discuss three of them to resolve the issue.
The Windows operating system, while robust and user-friendly, isn’t immune to errors. Among these, the 0x8007000D error is notably perplexing for many users. This article aims to unravel the intricacies of this error, its origins, and guide users towards effective solutions.
Contents
What is 0x8007000D?
The 0x8007000D error is essentially a system error code in Windows 10. It typically emerges during Windows updates or when trying to activate Windows. The error message usually reads: “The data is invalid,” hinting at data corruption or missing files.
Causes of 0x8007000D Error in Windows 10
Several factors can trigger the 0x8007000D error:
- Corrupted System Files: Damage to essential system files can lead to this error, especially during updates.
- Incomplete Updates: If a previous Windows update was interrupted or didn’t complete successfully, it might cause the 0x8007000D error in subsequent attempts.
- Malware Infections: Malicious software can modify or damage system files, leading to various errors, including 0x8007000D.
- Faulty Device Drivers: Outdated or corrupted drivers can conflict with system processes, causing this error.
3 Ways to Fix Error Code 0x8007000d in Windows 10
Method 1 – Use Windows Troubleshooter
This method works when the error occurs while trying to install a specific driver. So, we can use the Windows Update Troubleshooter to tackle the error.
Step 1: Open the Query menu in Windows by pressing Windows key + Q. Search for the Windows Update Troubleshooter. If it is not found there, you can also navigate for it in the Control Panel under the ‘System and Security’ section.
Step 2: Click on the option that says ‘Update Troubleshooter‘ and select ‘Fix problems with Windows update.’
Step 3: Go to the Advanced tab and check the box that says ‘Apply repairs automatically‘ and then run it is the administrator.
Step 4: Now, the Troubleshooter will look for errors and try to fix them while you need to wait.
Read More:
Method 2 – Using Command Prompt
Command Prompt is an excellent tool that helps us solve a number of errors through the terminal window, and it has proved its worth time and again.
Since it is fast as well as an influential tool provided by Windows, you can use it to resolve the error, either if the above two methods do not work, or you do not want to imply them.
Step 1: Press Windows key + X and after that, I chose the Command Prompt as an administrator.
Step 2: Type the command ‘DISM.exe /Online /Cleanup-Image /Scanhealth‘ and hit Enter.
Step 3: Then type ‘DISM.exe /Online /Cleanup-Image /Restorehealth’ and hit enter like before.
Step 4: Restart your computer to see if the Error Code 0x8007000D error has been resolved.
Method 3 – Reset the PC
In some of the cases, the corrupted file seems to be extensive enough to restore your computer to its factory settings. Keeping regular back-ups, in this case, might help to save the important data. To reset the PC, follow the given steps.
Step 1: Go to settings in the start menu and click on Change PC settings.
Step 2: Now, you need to select the Recovery option in the ‘Update and Recovery’ tab.
Step 3: There is an option that says ‘Refresh your PC without affecting your files.’ Click on it. If the version of Windows that you are using is an upgrade of the previous version, your Windows will go back to the previous version.
Step 4: Now, follow the on-screen instructions to refresh your PC. Now the PC will boot and power up good as new and the operating system can update itself.
Refreshing the PC works in most cases. Since most third-party software are the actual cause of this trouble and refreshing the PC removes all such software leaving the user files, this method is worth a try and might rid you of the 0x8007000D error.
Corrupted 0x8007000D Windows 10 Installation File
One of the main culprits behind the 0x8007000D error is a corrupted Windows 10 installation file. This means that the setup files required for the update or installation are either incomplete, missing, or corrupted. This can happen due to:
- Interruptions during the download process.
- Malware or virus infections.
- Disk write errors.
- Faulty storage media, like a damaged USB drive or DVD.
How to Clear Windows 10 Cache
Clearing the cache in Windows 10 can often resolve many errors, including the 0x8007000D. Here’s how you can do it:
- Temporary Files Cache:
- Type “Disk Cleanup” in the Windows search bar and select it.
- Choose the drive you wish to clean (typically C:).
- Check ‘Temporary files’ and any other file types you want to delete.
- Click ‘OK’ and then ‘Delete Files’.
- Windows Store Cache:
- Type “wsreset.exe” in the search bar and run the command. This will reset the Windows Store cache.
- DNS Cache:
- Open Command Prompt as an administrator.
- Type “ipconfig /flushdns” and press Enter.
- Thumbnail Cache:
- Follow the Disk Cleanup steps mentioned above and select ‘Thumbnails’ during the process.
Also Read:
Conclusion
Among the given three methods, at least one of them should be able to resolve the 0x8007000D error. However, if these methods do not work, you can also try to resolve the error by an automated tool.
They act as a utility at your disposal and come in handy in these kinds of situations. You can also run the DISM (Deployment Image Service and Management) tool that is a built-in utility, which aims to fix problems with corrupt files.
The 0x8007000D error, while bothersome, is an issue that can be tackled with the right knowledge. Whether it’s due to corrupted files or a result of malware, understanding its roots aids in its swift resolution.
Regular system maintenance, like clearing cache and updating drivers, can help keep such errors at bay, ensuring a smooth Windows 10 experience.


